PHP is an open-source, widely-used scripting language that allows developers to create dynamic websites and web applications. If you’re using Rocky Linux, installing PHP is an essential step to setting up your server for web development. In this blog post, we’ll walk you through the process of how to install PHP on Rocky Linux, so you can start building your web applications.
Prerequisites
Before we dive into the installation process, make sure you have the following:
- A Rocky Linux server or virtual machine.
- A user account with sudo privileges.
- An active internet connection.
How to Install PHP on Rocky Linux
Update your system
First, update your system by running the following command:
sudo dnf update -yThis will ensure that your system is up-to-date and has the latest security patches installed.
Install PHP (option 1)
To install PHP and its extensions, run the following command:
sudo dnf install php php-mysqlnd php-fpm php-cli php-common -y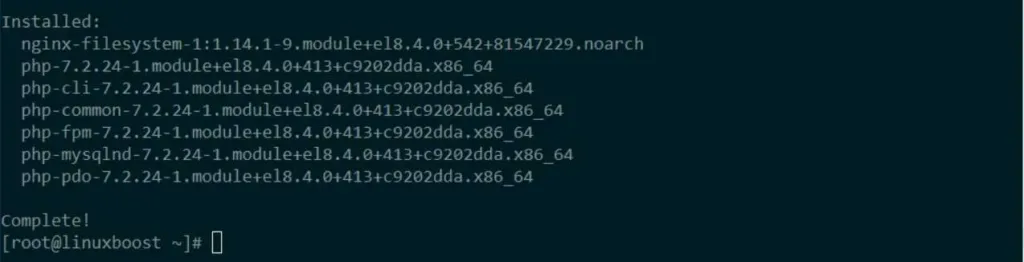
Enable EPEL and Remi repositories (option 2)
To install PHP on Rocky Linux, you need to enable two additional repositories: EPEL (Extra Packages for Enterprise Linux) and Remi.
Enable the EPEL repository with the following command:
sudo dnf install epel-release -yNext, enable the Remi repository by installing the dnf-utils package and adding the Remi repository with these commands:
sudo dnf install dnf-utils -y
sudo dnf install https://rpms.remirepo.net/enterprise/remi-release-8.rpm -y
Install PHP on Rocky Linux
Now that the EPEL and Remi repositories are enabled, you can install PHP. By default, the Remi repository provides multiple PHP versions. You can choose the version you want to install by enabling the appropriate module. In this example, we’ll install PHP 7.4:
sudo dnf module enable php:remi-7.4 -yInstall PHP and some commonly used extensions by running:
sudo dnf install php php-cli php-common php-fpm php-gd php-mbstring php-mysqlnd php-opcache php-pdo php-xml -yStart and enable PHP-FPM service
PHP-FPM (FastCGI Process Manager) is an alternative PHP FastCGI implementation that provides superior performance and process management. To start and enable the PHP-FPM service, run the following commands:
sudo systemctl start php-fpm
sudo systemctl enable php-fpm
Verify PHP installation
To verify that PHP has been successfully installed on your system, create a simple PHP file named info.php in the default web server document root (/var/www/html/):
echo "<?php phpinfo(); ?>" | sudo tee /var/www/html/info.phpNow, access the file in your web browser by visiting http://your_server_ip/info.php. You should see a detailed PHP information page, indicating that PHP is running correctly on your Rocky Linux server.
Conclusion
Congratulations! You’ve successfully installed PHP on your Rocky Linux server. Now you can start building and deploying your PHP-based web applications. If you need help setting up other components of your server, check out our other guides on how to install phpMyAdmin on Rocky Linux, how to install and configure LAMP stack on Rocky Linux, or how to set up a file server on Rocky Linux
If you’re using Ubuntu instead of Rocky Linux, you can follow our guide on how to create RAID 1 in Ubuntu. This will help you set up your Ubuntu server with a RAID 1 configuration for data redundancy and protection.
Additionally, if you’re interested in learning about other Linux distributions, you can explore our comparison articles like Proxmox vs. VMware ESXi and KVM vs. Proxmox VE Virtualization. These articles provide an in-depth analysis of different virtualization technologies and platforms, allowing you to make an informed decision when choosing a solution for your infrastructure.


