
Setting up an OpenVPN server on openSUSE can be a bit tricky, especially if you’re new to Linux. But don’t worry, this step-by-step guide will walk you through the entire process of How to Set Up an OpenVPN Server on openSUSE. Before we begin, make sure you have a working openSUSE installation. If you need help with that, check out our guides on how to install Ruby on openSUSE and how to change the SSH port on openSUSE.
How to Set Up an OpenVPN Server on openSUSE
Step 1: Update Your System and Install Prerequisites
First, let’s update the system and install the necessary packages. Open a terminal and run the following commands:
sudo zypper update
sudo zypper install openvpn easy-rsa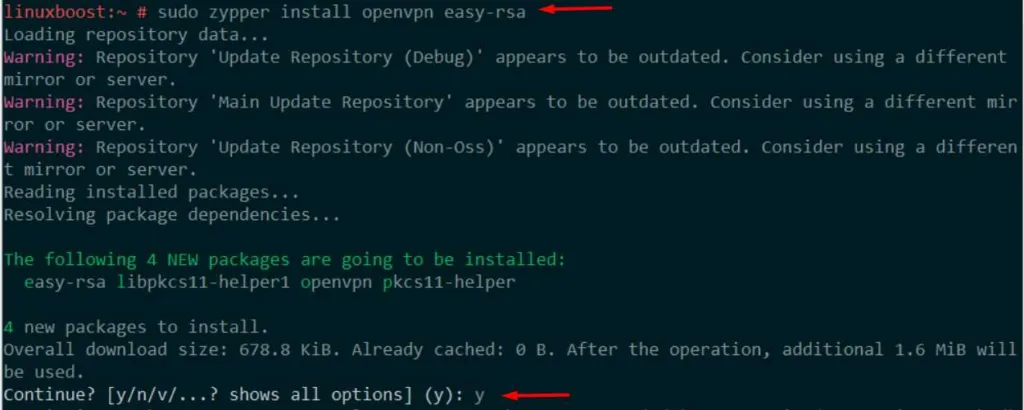
These commands will update your system and install OpenVPN and Easy-RSA, a tool used to manage SSL certificates.
Step 2: Configure the Certificate Authority (CA)
Now, let’s set up the certificate authority to issue certificates for the OpenVPN server and clients. Run the following commands:
sudo mkdir /etc/openvpn/easy-rsa/
sudo cp -R /usr/share/easy-rsa/* /etc/openvpn/easy-rsa/
cd /etc/openvpn/easy-rsa/
Next, edit the vars file to customize your CA settings. Open the file using your preferred text editor, such as Vim:
sudo vim varsUpdate the following values according to your requirements:
export KEY_COUNTRY="US"
export KEY_PROVINCE="CA"
export KEY_CITY="SanFrancisco"
export KEY_ORG="YourOrganization"
export KEY_EMAIL="[email protected]"
export KEY_CN="YourName"
export KEY_NAME="YourName"
export KEY_OU="YourOrganizationalUnit"
Save and close the file, then initialize the CA by running the following commands:
source vars
./clean-all
./build-ca
Step 3: Generate Server and Client Certificates
Generate the server certificate and key using the following commands:
./build-key-server serverCreate a Diffie-Hellman key exchange file to enhance security:
./build-dhNow, generate client certificates and keys. Replace client1 with a unique name for each client:
./build-key client1Step 4: Configure the OpenVPN Server
Copy the generated certificates and keys to the OpenVPN directory:
sudo cp keys/{ca.crt,server.crt,server.key,dh.pem} /etc/openvpn/Create a new server configuration file:
sudo vim /etc/openvpn/server.confAdd the following configuration, adjusting the parameters as needed:
port 1194
proto udp
dev tun
ca ca.crt
cert server.crt
key server.key
dh dh.pem
server 10.8.0.0 255.255.255.0
ifconfig-pool-persist ipp.txt
push "redirect-gateway def1 bypass-dhcp"
push "dhcp-option DNS 208.67.222.222"
push "dhcp-option DNS 208.67.220.220"
keepalive 10 120
comp-lzo
persist-key
persist-tun
status openvpn-status.log
verb 3
cipher AES-256-CBC
user nobody
group nogroup
tls-server
tls-auth ta.key 0
key-direction 0
log-append /var/log/openvpn.log
Save and close the file.
Step 5: Generate a TLS Authentication Key
To add an extra layer of security, generate
cd /etc/openvpn/easy-rsa/keys
openvpn --genkey --secret ta.key
sudo cp ta.key /etc/openvpn/
This command generates a ta.key file and copies it to the /etc/openvpn/ directory.
Step 6: Enable IP Forwarding
Enable IP forwarding by editing the /etc/sysctl.conf file:
sudo vim /etc/sysctl.confAdd the following line at the end of the file:
net.ipv4.ip_forward=1Save and close the file, then apply the changes:
sudo sysctl -pStep 7: Configure Firewall Rules
Configure firewall rules to allow OpenVPN traffic. If you’re using firewalld, run the following commands:
sudo firewall-cmd --permanent --zone=public --add-service=openvpn
sudo firewall-cmd --permanent --zone=public --add-masquerade
sudo firewall-cmd --reload
If you’re using iptables, make sure to install CSF on openSUSE and configure the appropriate rules.
Step 8: Start and Enable the OpenVPN Service
Start the OpenVPN service and enable it to start at boot:
sudo systemctl start [email protected]
sudo systemctl enable [email protected]
Step 9: Configure OpenVPN Clients
Now that your OpenVPN server is up and running, it’s time to configure your clients. For each client, copy the ca.crt, client.crt, client.key, and ta.key files from the server to the client’s machine. You can use tools like Wget or Zip and Unzip to transfer the files securely.
Create a client configuration file on the client’s machine, such as client.ovpn, with the following content:
client
dev tun
proto udp
remote [YOUR_SERVER_IP] 1194
resolv-retry infinite
nobind
user nobody
group nogroup
persist-key
persist-tun
ca ca.crt
cert client.crt
key client.key
remote-cert-tls server
tls-auth ta.key 1
key-direction 1
cipher AES-256-CBC
comp-lzo
verb 3
Replace [YOUR_SERVER_IP] with the public IP address of your OpenVPN server.
That’s it! You’ve successfully set up an OpenVPN server on openSUSE. Connect your clients using their respective client configuration files, and enjoy secure, encrypted communication between your devices. For more information on securing your system, check out our guide on how to protect your system from threats.


