Vim is a versatile and powerful text editor that has been a favorite among programmers and system administrators for decades. Known for its efficiency and customization options, Vim allows users to edit text files and even write code with ease. In this guide, we’ll walk you through the process of how to install Vim on your openSUSE system, and we’ll also discuss some useful tips for getting started with this powerful tool.
How to Install Vim on openSUSE
Table of Contents
- Prerequisites
- Installing Vim on openSUSE
- Configuring Vim
- Basic Vim Commands
- Conclusion
Prerequisites
Before we begin, you should have an openSUSE system with root or sudo privileges. If you’re new to openSUSE, you might want to check out our other tutorials for setting up your system, such as how to change the SSH port on openSUSE or how to install Python on openSUSE.
Installing Vim on openSUSE
To install Vim on your openSUSE system, simply follow these steps:
- Open a terminal window by pressing
Ctrl+Alt+Tor searching for “Terminal” in your system’s application menu. - Update your system’s package repositories by running the following command:
sudo zypper update- Install Vim using the following command:
sudo zypper install vim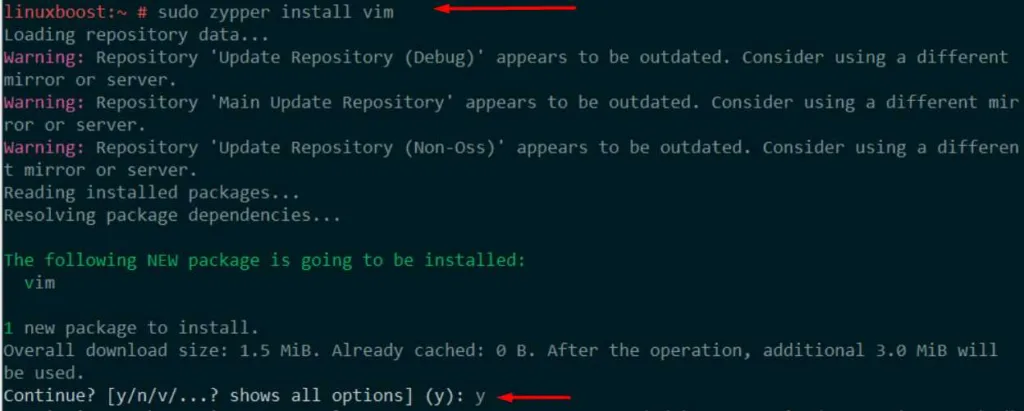
- Once the installation is complete, you can verify that Vim has been installed correctly by running:
vim --version
This should display information about your Vim installation, including the version number and build options.
Congratulations! You’ve successfully installed Vim on your openSUSE system. Now, let’s move on to configuring Vim and learning some basic commands.
Configuring Vim
To customize Vim’s behavior, you can create and edit a configuration file called .vimrc in your home directory. This file allows you to define settings, key mappings, and even custom functions to enhance your Vim experience. Here’s a simple example of a .vimrc file:
syntax on
set number
set tabstop=4
set shiftwidth=4
set expandtab
This configuration enables syntax highlighting, displays line numbers, and sets the tab width to 4 spaces. To create or edit your .vimrc, simply run vim ~/.vimrc in the terminal.
For more advanced configurations and tips, you might want to check out our how to install Nginx on openSUSE tutorial, which includes a section on configuring Vim for Nginx configuration files.
Basic Vim Commands
Vim uses a modal interface, which means that the same key can perform different actions depending on the current mode. Here are some basic Vim commands to help you get started:
i: Enter insert mode (type text)Esc: Return to normal mode (navigate and manipulate text):w: Save changes:q: Quit Vim without saving changes:wq: Save changes and quit Vim- `:e filename`: Open a file in Vim
dd: Delete a lineu: Undo the last actionCtrl+r: Redo the last undone actionyy: Copy a linep: Paste the copied line below the current line/search_term: Search for a term in the file:s/old_text/new_text/g: Replace all occurrences ofold_textwithnew_textin the current line:1,$s/old_text/new_text/g: Replace all occurrences ofold_textwithnew_textin the entire file
This is just a small sample of Vim’s extensive functionality. For a more comprehensive list of commands, you can refer to the Vim documentation by running vimtutor in the terminal or visiting the official Vim website.
Conclusion
In this tutorial, we’ve shown you how to install and configure Vim on your openSUSE system. We’ve also provided some basic Vim commands to help you get started with this powerful text editor. With Vim installed, you’ll be well-equipped to handle various text editing tasks and even write code efficiently.
If you’re looking to further enhance your openSUSE system, we recommend exploring our other tutorials such as how to install Git on openSUSE, how to install phpMyAdmin on openSUSE, and how to install CSF on openSUSE. These guides will help you set up essential tools and services for a well-rounded Linux experience.
As you become more proficient with Vim, you’ll find that it’s a powerful tool that can greatly increase your productivity. Whether you’re editing configuration files, writing code, or simply taking notes, Vim offers a level of flexibility and efficiency that’s hard to match. Happy editing!


