Python is a versatile, powerful, and easy-to-learn programming language that has become popular worldwide. Installing Python on your openSUSE system is essential for many applications, including web development, data analysis, and automation. In this tutorial, we will show you how to install Python on openSUSE step by step, whether you prefer to use the default package manager or compile it from the source.
How to Install Python on openSUSE
Table of Contents
- Prerequisites
- Installing Python using Zypper
- Compiling Python from source
- Setting up a Python virtual environment
- Conclusion
Prerequisites
Before installing Python on openSUSE, ensure your system is up to date:
sudo zypper updateInstalling Python using Zypper
The simplest method of installing Python on openSUSE is using the default package manager, Zypper. By default, openSUSE comes with Python 3 pre-installed. You can check the Python version by running:
python3 --version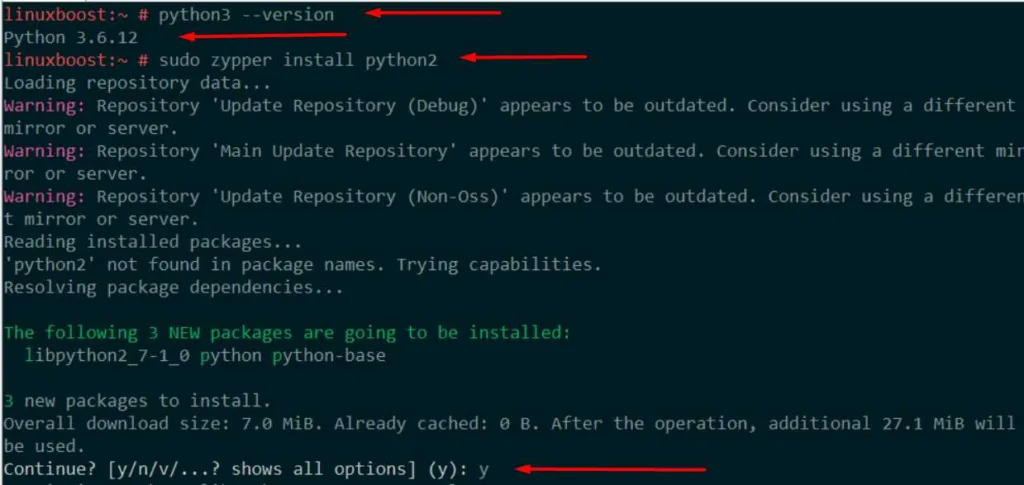
To install Python 2, execute the following command:
sudo zypper install python2Now you have Python 2 and Python 3 installed on your openSUSE system. You can switch between them by using the python2 and python3 commands.
Note: Python 2 has reached its end of life, and it’s recommended to use Python 3 for new projects.
Compiling Python from the source
If you want to install a specific version of Python, you can compile it from the source. To do this, follow these steps:
- Install the required dependencies:
sudo zypper install gcc make openssl-devel zlib-devel libffi-devel readline-devel sqlite3-develDownload the desired Python version from the official Python website:
wget https://www.python.org/ftp/python/3.9.7/Python-3.9.7.tar.xzReplace 3.9.7 with your desired version.
Extract the downloaded archive:
tar -xf Python-3.9.7.tar.xzChange to the extracted directory:
cd Python-3.9.7Configure the Python installation:
./configure --enable-optimizationsCompile and install Python:
make
sudo make altinstall
Using altinstall prevents the new Python version from replacing the system Python.
Verify the new Python version:
python3.9 --versionReplace3.9with your installed version.
Setting up a Python virtual environment
A Python virtual environment allows you to isolate project-specific dependencies and avoid conflicts with system packages. To set up a virtual environment, follow these steps:
- Install the
virtualenvpackage:
sudo zypper install python3-virtualenvCreate a new directory for your project:
mkdir my_project
cd my_project
Create a virtual environment:
python3 -m venv venvActivate the virtual environment:
source venv/bin/activate
Now you can install Python packages specific to your project without affecting the system packages
- Install project-specific Python packages:
pip install package_nameReplace package_name with the desired Python package. You can also use a requirements.txt file to install multiple packages at once:
pip install -r requirements.txtDeactivate the virtual environment when you’re done working on your project:
deactivate
Updating Python
To keep your Python installation up-to-date, follow these steps:
- Update your system packages:
sudo zypper updateUpgrade the Python package:
sudo zypper upgrade python3Replace python3 with python2 if you want to upgrade Python 2.
Note: If you compiled Python from the source, you need to repeat the compilation steps with the updated source code.
Conclusion
You’ve now learned how to install Python on openSUSE using both the package manager and by compiling from source. You also know how to create a Python virtual environment to isolate your project dependencies. With Python installed, you can now explore various applications and projects, like web development with Django, data analysis with pandas, or even machine learning with TensorFlow.
For more Linux-related tutorials and guides, visit our LinuxBoost blog. We cover a wide range of topics, including how to set up a web server on openSUSE.


