Managing databases can be a daunting task, especially for those who are not familiar with the command line. That’s where phpMyAdmin comes in, providing a user-friendly, web-based interface to manage MySQL or MariaDB databases. In this tutorial, we’ll walk you through how to install phpMyAdmin on openSUSE system.
Before we start, make sure you have already installed PHP, MariaDB or MySQL, and a web server like Apache or Nginx. If you haven’t, follow the linked tutorials to set them up.
How to Install phpMyAdmin on openSUSE
Installing phpMyAdmin
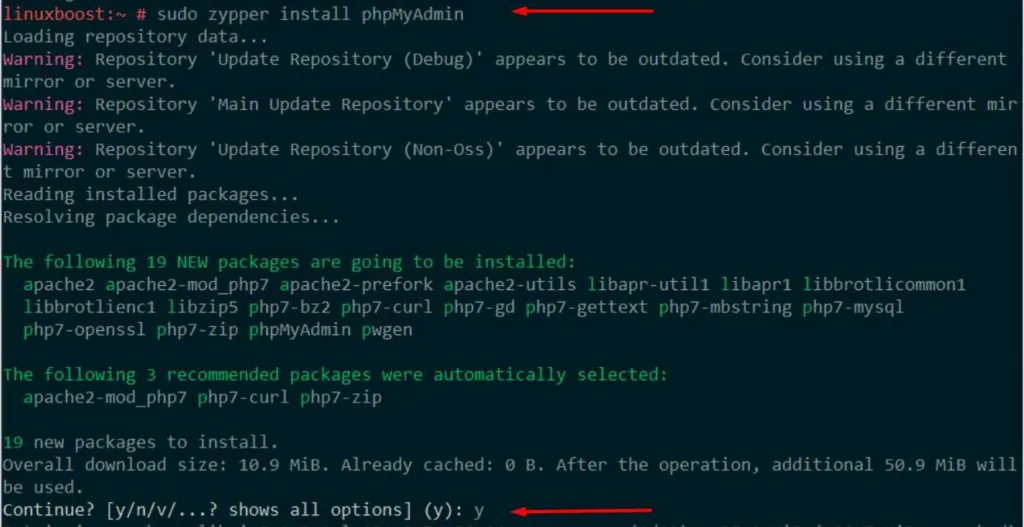
First, we’ll install phpMyAdmin from the official openSUSE repositories. Open a terminal and run the following command:
sudo zypper install phpMyAdmin
Configure the Web Server
Next, you’ll need to configure your web server to serve phpMyAdmin.
Apache Configuration
If you’re using Apache, create a new configuration file:
sudo nano /etc/apache2/conf.d/phpMyAdmin.confPaste the following configuration into the file:
Alias /phpMyAdmin /usr/share/phpMyAdmin
Alias /phpmyadmin /usr/share/phpMyAdmin

<Directory /usr/share/phpMyAdmin>
    Options FollowSymLinks
    DirectoryIndex index.php

    <IfModule mod_php5.c>
        php_admin_value upload_tmp_dir /var/lib/phpMyAdmin/tmp
        php_admin_value session.save_path /var/lib/phpMyAdmin/tmp
    </IfModule>
    <IfModule mod_php7.c>
        php_admin_value upload_tmp_dir /var/lib/phpMyAdmin/tmp
        php_admin_value session.save_path /var/lib/phpMyAdmin/tmp
    </IfModule>

    AllowOverride All
    Require all granted
</Directory>

<Directory /usr/share/phpMyAdmin/setup>
    <IfModule mod_authz_core.c>
        Require all denied
    </IfModule>
    <IfModule !mod_authz_core.c>
        Order Deny,Allow
        Deny from All
    </IfModule>
</Directory>

<Directory /usr/share/phpMyAdmin/libraries>
    Order Deny,Allow
    Deny from All
    Allow from None
</Directory>

<Directory /usr/share/phpMyAdmin/templates>
    Order Deny,Allow
    Deny from All
    Allow from None
</Directory>
Save and close the file, then restart Apache:
sudo systemctl restart apache2Nginx Configuration
If you’re using Nginx, create a new configuration file:
sudo nano /etc/nginx/conf.d/phpMyAdmin.confPaste the following configuration into the file:
location /phpMyAdmin {
    alias /usr/share/phpMyAdmin/;
    index index.php;
    try_files $uri $uri/ @phpMyAdmin;

    location ~ ^/phpMyAdmin/(.+\.php)$ {
        alias /usr/share/phpMyAdmin/$1;
        fastcgi_pass unix:/var/run/php-fpm.sock;
        fastcgi_param SCRIPT_FILENAME $request_filename;
        include fastcgi_params;
    }
}

location /phpmyadmin
{
rewrite ^/* /phpMyAdmin last;
}

location @phpMyAdmin {
rewrite ^/phpMyAdmin(/.*)$ /phpMyAdmin/index.php$1 last;
}
After you have added the previous configuration lines, continue with the following configuration:
location /phpmyadmin {
    rewrite ^/* /phpMyAdmin last;
}

location @phpMyAdmin {
    rewrite ^/phpMyAdmin(/.*)$ /phpMyAdmin/index.php$1 last;
}

location ~ ^/phpMyAdmin/(.+\.php)$ {
    alias /usr/share/phpMyAdmin/$1;
    fastcgi_pass unix:/var/run/php-fpm.sock;
    fastcgi_param SCRIPT_FILENAME $request_filename;
    include fastcgi_params;
}
Save and close the file, then restart Nginx:
sudo systemctl restart nginxNow, the Nginx configuration is properly set up to handle requests to /phpmyadmin, redirecting them to /phpMyAdmin and serving the correct PHP files.
Configure phpMyAdmin
After installing and configuring the web server, you’ll need to set up a secret passphrase called the “blowfish_secret.” This passphrase is used to encrypt cookies in phpMyAdmin.
Open the phpMyAdmin configuration file:
sudo nano /etc/phpMyAdmin/config.inc.phpFind the line that starts with $cfg['blowfish_secret'] and replace the text inside the single quotes with a strong passphrase. Make sure it’s at least 32 characters long.
$cfg['blowfish_secret'] = 'your-strong-passphrase-here';Save and close the file.
Access phpMyAdmin
You can now access phpMyAdmin by opening your favourite web browser and navigating to the following URL:
http://your_server_ip_or_domain/phpMyAdminLog in using your MariaDB or MySQL credentials, and you’ll be greeted by the phpMyAdmin interface.
Secure phpMyAdmin (Optional)
For added security, you can restrict access to phpMyAdmin to specific IP addresses. In this example, we’ll demonstrate how to do this with Apache.
Edit the Apache configuration file for phpMyAdmin:
sudo nano /etc/apache2/conf.d/phpMyAdmin.confFind the following line:
Require all grantedReplace it with:
Require ip your_ip_addressReplace your_ip_address with the specific IP address, you want to allow access from. Save and close the file, then restart Apache:
sudo systemctl restart apache2Now, only the specified IP address will be able to access phpMyAdmin.
For Nginx, you can achieve the same by adding an allow directive followed by your IP address and a deny all directive in the /phpMyAdmin location block:
location /phpMyAdmin {
    allow your_ip_address;
    deny all;
    ...
}
Replace your_ip_address with the specific IP address you want to allow access from. Save and close the file, then restart Nginx:
sudo systemctl restart nginxConclusion
Congratulations! You’ve successfully installed and configured phpMyAdmin on your openSUSE system. Now you can easily manage your MySQL or MariaDB databases through a user-friendly web interface. Don’t forget to explore other openSUSE tutorials to further enhance your Linux server capabilities.


